You hear it before you see it. The sound that happens when your foot hits the living room rug and doesn’t quite lift back up. You tilt your shoe, and your stomach drops. There it is: a pink or gray blob of chewing gum that has been flattened and stuck to the fibers of your thick carpet like modern art you never wanted.
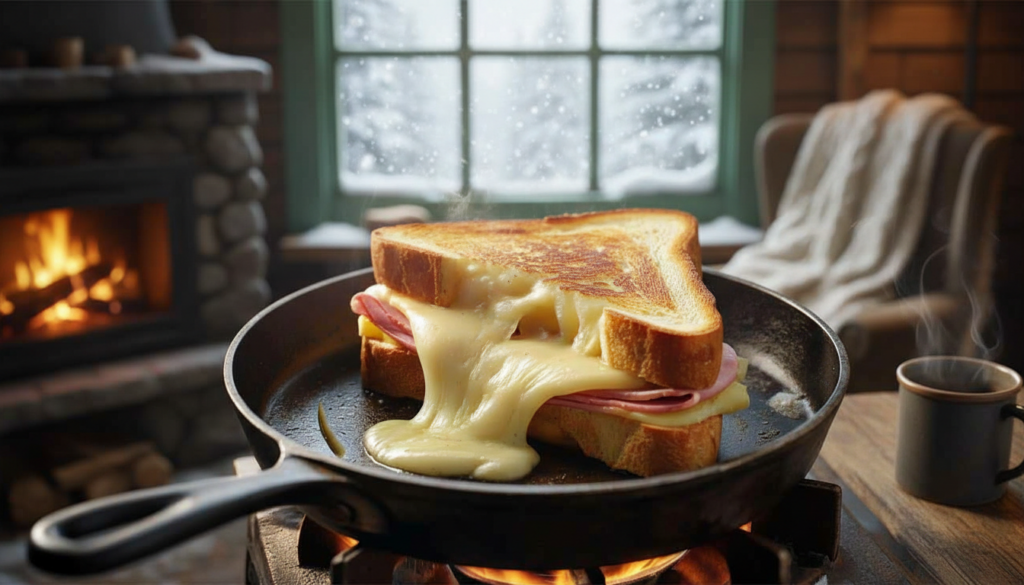
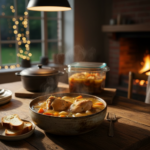
When it’s cold outside and you don’t want to go out, a hot, gooey toastie made in a simple frying pan can turn an ordinary weeknight into a comforting ritual. You don’t need a raclette machine or a special kit; all you need are four simple ingredients, a pan, and fifteen minutes to make a delicious winter dinner.
Why this raclette toastie is so good on cold nights
Raclette usually means a full meal, with a grill on the table, lots of potatoes, charcuterie, pickles, and half of the fridge on the table. Great, but not really a Tuesday night movie. This version keeps the spirit of Alpine comfort and gets rid of everything else.
Imagine a mini raclette for one or two,” pressed into golden bread and cooked in a pan until the cheese starts to melt.

The idea is simple: good bread, raclette cheese, ham, a little mustard, and enough butter to make the crust crackly and brown. The end product is more like a French croque-monsieur than an American grilled cheese, but it still has that unmistakable raclette flavor that people associate with ski trips.
The 4+1 ingredients that make a big difference
You don’t need much to make two big toasties. Thickness and quality are the most important things.
- 4 slices of thick-cut bread, like country-style, farmhouse, or sandwich loaf
- 4 to 6 slices of raclette cheese, either plain, smoked, or peppered
- Two pieces of cooked ham (or turkey for a lighter version)
- 1 tablespoon of mustard (either grainy or mild)
- For the pan and the bread, about 30 g of softened salted butter
It’s easy to figure out the ratio: two slices of bread, two layers of raclette, one layer of ham, a thin layer of mustard, and a lot of butter.
Raclette cheese melts quickly and stays soft and stretchy, so it’s perfect for this. If you can only find raclette in a block, cut it into thick slices so that the center is gooey.
Step by step: how to make the best skillet raclette toastie
Picking out the bread and getting it ready
Begin with bread that can hold the filling. The melted cheese and hot ham will make the thin, floppy slices fall apart.
- Put the slices flat on a board.
- Put a thin layer of mustard on one side of each slice, all the way to the edges.
The mustard is important. The acidity cuts through the cheese and butter fat, so the whole thing doesn’t feel heavy after two bites.
Layering to make a molten center
The structure is simple but on purpose:
- Put a layer of raclette on top of two slices of mustard-covered bread.
- Put a slice of ham on top, folded to fit inside the crusts.
- Put another layer of raclette on top of the ham.
- Put the last piece of bread on top, with the mustard side facing in.
Putting the ham between two layers of raclette makes a perfectly melted center that doesn’t come out with the first bite.
Gently press down with your palm to keep the layers together. You want a small “brick” that will toast evenly in the pan.
How to get that golden, crackling crust when you cook in a pan
The frying pan is what makes this recipe so easy to follow. You don’t need any machines or to preheat the pan for a long time. A good non-stick or heavy-bottomed pan will do.

| Step | What to do and why it matters |
|---|---|
| WarmthPut some butter in a pan and heat it up over medium heat until it starts to foam. | Gives a nutty, even browning |
| First sidePut the toasties in the pan and cook them for 3 to 4 minutes. | Lets the bread get hard and start to crisp up. |
| If the bread gets too dark too quickly, turn down the heat and cover it for a short time. | Makes sure the cheese melts all the way through without burning the crust. |
| Flip the second side, add the rest of the butter, and cook for another 3 to 4 minutes. | Makes both sides a deep golden color. |
While you cook, listen for a soft sizzle, not a loud hiss. The bread shouldn’t have black spots; it should be a deep golden brown. If the cheese isn’t soft yet, put a lid on the pan for a minute to keep the heat in and help the center melt.
When you press down on the toastie with a spatula, the bread should feel hard and crisp, and cheese should start to ooze out at the edges.
What to eat with a toastie that melts a lot
New things that make the meal balanced
Because this sandwich is rich, the side dish needs to be fresh and sharp.
- A bowl of crunchy green salad (rocket, lamb’s lettuce, or mixed leaves) with a sharp dressing made of cider vinegar
- Pickles: small gherkins and white onions in vinegar, a classic side dish for raclette
- Add lemon juice to thin slices of raw fennel or apple to make them taste even fresher.
The acidity in the vinaigrette and pickles “cleans” the palate between bites of melted cheese, making the whole plate feel lighter than it is.
Getting ready for full winter comfort
You can make a little winter plate around the toastie to make it as cozy as possible:
- Mushrooms fried in a pan with garlic and parsley
- Roasted potatoes or baby new potatoes that have been cut in half and made crispy in the oven
- A little bit of crushed walnuts on top of the salad for texture
A little bit of freshly grated nutmeg on the hot toastie at the end gives it a hint of “mountain chalet” flavor that is almost nostalgic.
Different ideas, tips, and small changes that make a big difference
Simple changes to the original
Once you know the basic method, you can use it in a lot of different ways. Some thoughts:
- For a richer flavor, use smoked turkey or pastrami instead of ham.
- If you want a barbecue smell without lighting a grill, use smoked raclette.
- For a nod to traditional raclette, add very thin slices of onion or a few cooked potato slices between the layers of cheese.
- Skip the meat and add sautéed mushrooms or caramelized onions to make it vegetarian.
Just don’t put too many wet things on the toastie, or the middle will get soggy before the cheese has a chance to melt all the way.
How to understand the “raclette effect” at home
People love raclette for more than just the cheese. The combination of heat, fat, salt, and acidity is what makes you feel relaxed and sleepy after a long day in the cold. This toastie makes that combination on a much smaller and faster scale.
There is, of course, a trade-off. It has a lot of fat and salt, so it’s a pretty heavy meal. It helps to have it with a big bowl of salad, a lot of water, and not too much of it. If you want a lighter version of the same thing, try turkey instead of ham and only two slices of cheese per sandwich. This will still give you a satisfying melt without being as heavy.
This recipe is like a winter “emergency kit”: it doesn’t require much shopping, cooks quickly, is very comforting, and is easy to share.

This skillet raclette toastie is surprisingly good at filling the gap on cold nights when you don’t have a lot of energy and want something that feels a little like being on a ski vacation. Once you learn how to time things in your pan and find the cheese, mustard, and pickle combination you like best, this recipe becomes one you make again and again as soon as the frost hits the windows.