There is already a quiet race going on inside for next spring’s harvest.
Most gardens go to sleep in the winter, but more and more people who grow their own food are getting their sweet potatoes ready for the winter. By getting tubers to sprout now, they’re getting strong young plants ready to go into warm soil as soon as the risk of frost is gone.
The secret season for sweet potatoes is winter.
Sweet potatoes are plants that grow in warm, tropical places and need time and warmth to do their best. In many temperate areas, the time to grow things outside is short. That’s when winter sprouting happens.

You can get a few important weeks of growth before planting time by starting “slips” inside in January or February.

Instead of planting the tuber itself, people usually grow sweet potatoes from slips. These are leafy shoots that grow from the tuber. After they grow, they are cut off and planted as separate plants. If your slips are strong, you’ll have a better chance of getting a good harvest in the summer.
This job is easier to do when the weather is quieter in the winter. You don’t have to rush to do everything in April when your kitchen table is already full of seeds, compost bags, and seed trays.
Picking the right sweet potatoes to grow
The tuber is where the whole thing starts. Not all sweet potatoes from the store will act the same way.
Put healthy, untreated tubers first
To make sure they sprout, choose sweet potatoes that are clean, firm, and have no soft spots, mold, or deep cuts. As soon as heat and moisture are added, any sign of rot tends to spread quickly.
Organic sweet potatoes are usually the best choice because they are less likely to have been sprayed with chemicals that stop them from sprouting.
It’s a good sign if you see little dark dots or eyes on the skin. Those are places where slips can happen and growth can happen. When you wash them, be careful not to scrape them off, as this can lower the number of shoots you get.
Some named types, like “Georgia Jet” and “Beauregard,” are known for sprouting well and giving good yields in cooler climates. If your local garden center sells seed potatoes that are meant to be planted, they are worth the small extra cost over tubers that you buy at random stores.
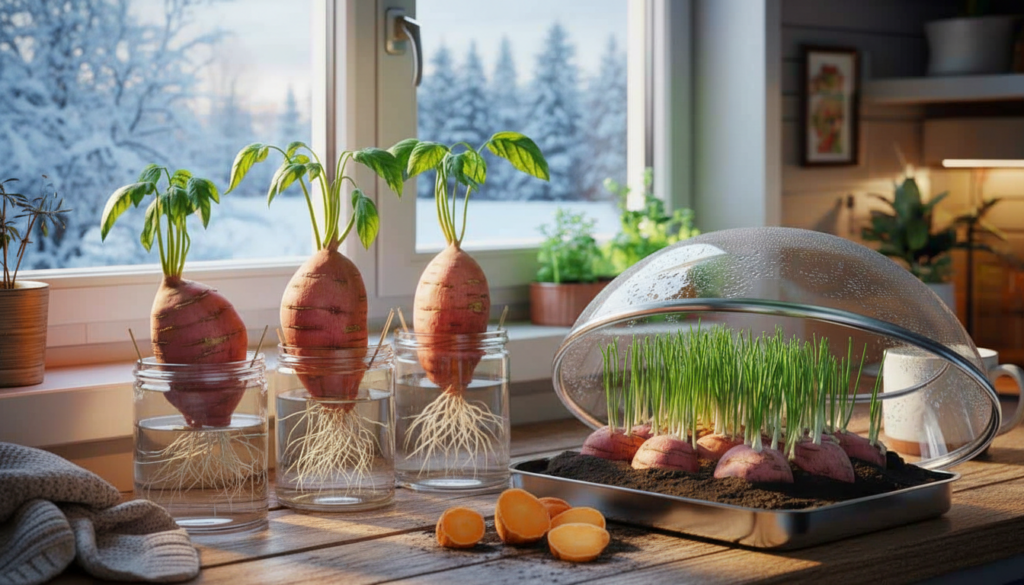
The old way of using a jar and a toothpick
- One of the easiest ways to start slips is to put them in water and use toothpicks to hold the tuber in place.
- Put three or four toothpicks in the middle of the sweet potato.
- Put the toothpicks on the edge of a jar so that the tuber is partly hanging.
- Put the pointed end in water and leave the round end above the surface.
- Try to get about 70% of the tuber to be under water.
Put the jar in a room that is warm and bright, between 20 and 25 degrees Celsius. A sunny windowsill above a radiator is a good place to put plants, as long as the air isn’t too dry. To keep the water clear and full of oxygen, change it often.
The warm base helps roots grow in the water, and the top of the tuber pushes out leafy shoots.
You should see roots spreading into the jar and pale green shoots breaking through the skin in two to four weeks. You can break or cut off the slips and root them separately once they are 10 to 15 cm long.
Cutting the tuber to make more plants
People who don’t have a lot of space or money often try to get as many plants as they can from each tuber. That’s a smart way to do it.
Using compost instead of water
You don’t have to hang the whole tuber; you can cut it into thick pieces and put them in seed trays or shallow boxes of compost.
- Cut the sweet potato into smaller pieces, each with at least two eyes.
- Put the pieces on fine, moist compost with the cut side touching the compost and the skin facing up.
- Gently press them down so they fit snugly, but don’t bury them all the way.
- Make sure the compost is always moist, but not too wet.
A clear cover, like a propagator lid or a plastic dome you make yourself, helps keep heat and moisture in. Leave small gaps or open it every day so that stale air and too much condensation don’t make mold and fungi grow.
Many gardeners can get six to eight strong slips from one tuber, and each slip will grow into a new plant.

As the weeks go by, groups of shoots start to grow on the skin side. When each shoot has a few leaves and a good stem, you can gently twist or cut it off the tuber and put it in a pot.
Keeping the humidity and temperature just right
Heating can make the air inside in the winter surprisingly dry. Sweet potato slips need a lot of water to grow roots and leaves, especially when they are in compost.
The goal is a steady, slightly wet environment, not one that is too wet. Compost that is too wet kills roots and makes things rot. Lift the tray every now and then to see how heavy it is, and only water it when it feels noticeably lighter.
If there are small drops of condensation on the dome in the morning but it clears up during the day, the conditions are about right. It’s too wet if water runs in streams down the inside. Open the vents or lift the cover for longer.
When and how to break up the slips
You can plant the slips on their own when they are about the length of your hand.
| Stage | What to do |
|---|---|
| 10–15 cm tall, several leaves | Cut or twist the slip away from the tuber near its base. |
| Freshly removed slips | Place in a glass of water or moist compost to root. |
| Slips with visible roots | Pot individually in small containers with free-draining compost. |
| Last frosts passed | Harden off gradually, then plant outside in warm soil. |
What “slips” are and why they are important
New gardeners might get confused by the word “slip.” It just means the little shoot that grows from a sweet potato tuber. Each slip has the same DNA as the parent tuber.
If you grow from slips instead of seeds, the variety will stay true, and you’ll get a head start on the season.
Sweet potatoes don’t do well in the cold, so every extra week you can give them in a safe place can mean bigger roots and fuller vines by fall.
Real-life situations for different homes
If you live in a small flat with only a bright windowsill, you might only be able to fit one or two jars. You could then make a few slips for a balcony planter or fabric grow bag. That still gives you a lot of roots by the end of summer, enough for a few meals.
If you have a porch or conservatory, it makes sense to use bigger trays of compost-covered pieces. You can make a small production line by putting one tray of freshly cut tuber chunks, one tray of sprouting pieces, and one tray of slips that are already potted on.
People who have greenhouses that aren’t heated can move the potted slips there when the nights start to warm up. This will make them tougher so they can handle being planted out better.
What the risks and rewards are and how to stack the odds
There are a few things that could go wrong. Too much moisture and not enough air flow can cause mold to grow on the tubers or white fuzz to form on the compost surface. Usually, taking the cover off for longer periods of time fixes the problem. Throw away a piece of tuber that smells bad or falls apart before it causes problems for other people.
On the plus side, slips that are carefully raised like this tend to be stronger than plants that are bought at the last minute. You choose the type, the conditions for growing, and the time. Families turn the process into a quiet winter project by checking the roots in jars, counting the new leaves, and marking the calendar for planting day.
You can turn sweet potatoes from a risky experiment into a dependable annual crop by making winter a time to get ready.

Once you get the hang of it, you can use the same method on other crops as well. Tomatoes, peppers, and basil all do better when they are started inside early, but they all need different things. The idea is still the same: when the garden looks dead and still, the next season can already be starting on a sunny sill inside.